Category Archives: Directions

Manifesto Formats

Manifestos could be written much like a white paper, it “starts with a big picture and leads readers to the proposed solution. Make the headings clear and specific so that busy readers can scan the white paper effectively.”

Manifestos should be captivating, persuasively written, with appealing design elements

Manifestos can take the form of a white paper, (text heavy, some graphics, example) or can draw on design and formatting elements of the Internet Freedom Manifesto.

Manifestos must be clearly written following basic grammatical rules. Writing can be informal in order to appeal to your audience/the public.

Manifesto Presentations

Lightening Talk: 3 slides, 2 minutes…Go!

Imagine you are having a conversation with a friend about your manifesto topic. You have 3 minutes to tell them about this issue, the problem and make a POINT about how we could take action to address this issue. (And you have visuals to help you make these points 🙂 ).

Use this presentation to test out your ideas and making your point. You can  end your presentation (or any statement in a conversation) with a question: Does this make sense? What do you think? This is a good opportunity to get feedback from your peers.

  • Slide 1: Present the topic
  • Slide 2: Present the problem, provide an example
  • Slide 3: Present a solution, propose an actionable step that could be taken towards this solution
  • Slide 4: Sources

Add google slides to this folder. Make sure your name is in the title of the slides.

Example Manifesto and Declarations

The Montreal Declaration “for responsible AI development”

Internet Freedom Manifesto “The Netherlands needs an open internet; a  platform where everyone can easily share and freely access information”

Twitter Ethics Manifesto “Perhaps each time we log in, we should re-read Twitter’s privacy agreement, their legally binding contract. Perhaps we should remind each other and ourselves that Twitter is a closed, private corporation…”

Data and Control–A Digital Manifesto: “This is a plea for democratic supervision and regulation of the large data sets that are currently being collected all over the digital world — a plea driven not by fears for the privacy of the individual but by worries that a privileged knowledge of the mechanics governing the social world could allow for a one-sided and largely unrecognized control of the masses.”

Public Domain Manifesto: “The Public Domain, as we understand it, is the wealth of information that is free from the barriers to access or reuse usually associated with copyright protection…Having a healthy and thriving Public Domain is essential to the social and economic well-being of our societies.”

Guerrilla Open Access Manifesto (by Aaron Swartz, 2008): “Information is power. But like all power, there are those who want to keep it for themselves. The world’s entire scientific and cultural heritage, published over centuries in books and journals, is increasingly being digitized and locked up by a handful of  private corporations.” (PDF – original format)

Digital Manifesto Archive Collections

Midterm Examples

This semester I have asked  you all for a more traditional essay with multimedia embedded in within the essay (in the form of links, images, and videos). You are also asked to create an original digital artifact to help explain your topic.

In past years, I have tasked students with creating the whole assignment  in a digital format, examples below. To clarify, I have asked you all for a multimedia essay that contains a small/short artifact like the ones below. So, basically a hybrid of the two types of assignment examples below. You will create a longer, more coherent essay with media embedded within the essay plus a short artifact.

Essay Examples: Some of these are different topics or shorter reading summaries that I used to assign but all follow a multimedia essay format.

Artifact Examples: These examples highlight some of the digital tools I suggested you try out for your artifact. I strongly encourage you to move beyond slides* (since you are likely well-versed in  creating them anyway). This is a good chance to try out prezi, timeline JS, or canva for infographics.

*If you plan to use slides, use Google Slides and embed them into your presentation using this short code:

gdoc link=”INSERT GOOGLE SLIDES SHARING LINK HERE” height=”1000″

(add [ and ] at beginning and end to display)

I requested reliable sources for your midterm. If you’re not sure if the website if “reliable,” Check out Wikipedia’s list of Perennial Sources

Mid-Term: “A Short Guide to ______”

For your midterm you will choose a New Media “Entity”. This can be a company, website, digital tool, you name it. Some examples include Space X, Twitch, Bitcoin, and Oculus.

The Short Guide will be written as a multimedia essay with an accompanying digital artifact (prezi, infographic, or other). The essay will be both an overview and analysis of your new media entity

Each “Short Guide” will have the following SECTIONS:

  • Introduction: A compelling blurb to grab readers
  • Overview of Function & Commons uses: What (it is), How (it works), Why (people use it)
  • Historical Background: founding, development, timeline (When)
  • Economic/Financial Background: funding, business model (Who)
  • Strengths & Weaknesses: good/bad effects, uses, ethical and moral issues
  • Web 2.0 – Web 3.0: How does this entity display these characteristics
  • Role in (network) society: Identify how this artifact demonstrates 3 characteristics
  • Conclusion: wrap it up, look to the future

FORMAT It is called a “Short Guide” because it should be JAM PACKED with tid-bits of interesting, important, and descriptive information. Paragraphs should be  succinct, and the guide should be sprinkled with info ‘blurbs’  with pictures, graphs, data visualizations. All information, media, etc should always be linked to a source!

SOURCES: Reference your sources by hyperlinking to them! You should have AT LEAST THREE reliable sources per section (Except intro and conclusion, 18 total) and ONE piece of Media per section (8).If you’re not sure if the website if “reliable,” Check out Wikipedia’s list of Perennial Sources.

ORIGINAL DIGITAL ARTIFACT: Each short guides will contain one piece of media, created by you! It can be a prezi, an infographic, video, you name it. The artifact does not need to cover all information in the short guide, rather it should highlight an important point or fact that is best explained through methods other than text.

This is an Information & *Design* Oriented project. That means the information and sources are most important but design is really important too! Guides should grab viewers; they should be Informative, Interesting, + Aesthetic.

Midterm Proposal Post

On SUNDAY MARCH 10th you will provide preliminary idea for the new media entity you would like to focus on. You will also provide ideas for what type of digital artifact you will create. Proposals should answer the following questions:

  • What is the new media entity? Why did you choose it?
  • What aspects of this artifact that you will need to research?  Where will you get your sources?
  • What form will your digital artifact take take?

Posts should be 300+ words and link to 2 credible sources of information that you will use in your final guide.

How to Post

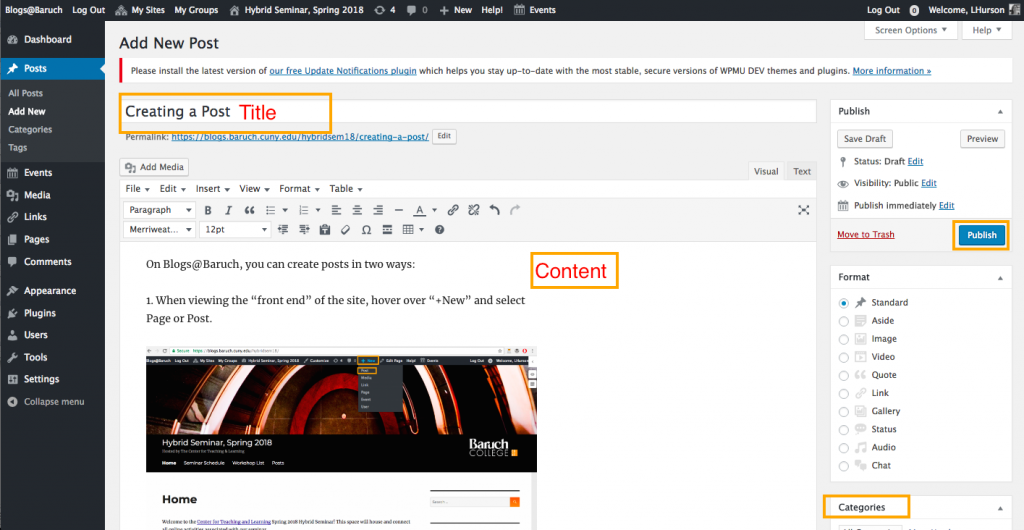
You must be signed into Blogs@Baruch to post. So first sign in and then follow the directions below.

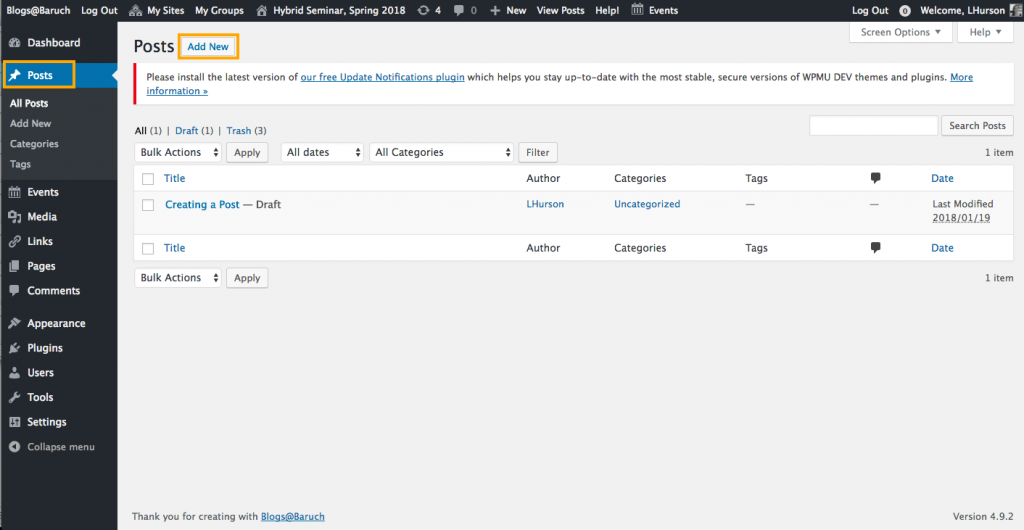
You can create posts in two ways:

1. When viewing the “front end” of the site, hover over “+New” and Post.

2. Or, in the dashboard, visit the “Posts” area and click the “Add New” button on the top left.

Once you are in the post editor, add a post title and content.

Post Guidelines

  • Posts should be at least 250 words
  • Posts should be relevant to the course topic and materials
  • Posts should not contain graphic, explicit, or inappropriate content or links
  • Posts should be clearly written
  • Posts should be respectful to the instructor, students, and all other individuals
  • The instructor reserves the right to edit or remove any posts that do not follow these guidelines or are inappropriate for this site

Always Add Links! Add a link by highlighting a keyword in your post, clicking the link icon and pasting the Link URL.

Always remember to categorize your post!

Once complete, click Publish to make it live!


Hypothes.is & Annotation Directions

Throughout the semester we will be annotating several articles with an online tool called Hypothes.is. Hypothes.is can be used publicly or in private-facing groups. We will be annotating in a group so our annotations are only visible to our class. If you do not annotate in the group, your annotation will be public so remember to select our group before annotating.

IMPORTANT NOTE: Hypothes.is annotation works best on a computer or tablet. It does not work well on a phone. If you have questions about getting access to a computer or laptop on campus, or borrowing or renting one from the library, please feel free to talk to me about how to do this.

Why we Annotate

In this class, reading is not a passive activity. When we annotate we will comment on the texts as we read them. By annotating, we will be able to read and respond to each others comments, AKA annotations and talk about the text online before we get to class. A few guidelines for annotating are below.

Annotate passages that:

  • You think are important. How does this passage define/connect to/critique the main idea of the article?
  • You don’t understand. Highlight/annotate to ask a question. I bet other people have the same question too!
  • That you agree or disagree with. Highlight/annotate to tell us why.
Setting Up Hypothes.is

To join and setup Hypothes.is, follow the steps below.

Go to the Hypothes.is site, and sign up for a username. It should be your FIRSTNAME and lastname initial. For example: JessicaN

Once you have a username, sign in to your hypothes.is account.

Click the following link to join our course group: Join our PNM19 Hypothesis group

Using Hypothes.is

To annotate using Hypothes.is follow the steps below.

Sign In: First, make sure you are signed into hypothes.is and logged into our group.

Go to Group: The title at the top of annotation sidebar tells you what area or group you are annotating within. If you are not in any group, it will say Public. To get into our group click the word Public and select our group (“PNM19”) from the list. If our group name does not appear, you have not been added. You will need to click this link to get added to our group. Once you click this link, you will see our group in the drop-down menu of the annotation sidebar.

Annotate: Visit our Course Schedule to find the articles to annotate. Click one of the articles. You will be taken to a new page with the article and the annotation sidebar. Look at the sidebar title to confirm that you are in our group area. Use your cursor to highlight a piece of text you would like to annotate. Click “Annotate” from the pop-up that appears over the highlighted text. Write your annotation in the sidebar and post it to our group area.

Read the directions above and/or watch this how-to video to learn how to use Hypothes.is.

Tl;dr